Posts

Showing posts from June, 2009

TiddlyWiki - How to install the Beta version

Anyone installing the TiddlyWiki beta version will probably already know how to do this. But anyway, this is for those that want a quick 1-2-3... Remember, as stated on the TiddlyWiki beta page, and as with anything "beta" (although half the services on the web these days are in beta) don't use it for important data, and don't complain if it breaks!.. just report it to the developers ;-) So, get TiddlyWiki beta as follows: Go to http://tiddlywiki.com/beta/ Now just save this web page locally to your computer In Internet Explorer 6 you do this by going to File -> Save As (in most browsers the keyboard shortcut is Ctrl+S) Save the browser page as HTML-only (tip: put "beta" somewhere in the filename so you don't forget) You have now saved your TiddlyWiki Beta locally. So you can open it and edit it as usual. Now if you want to upgrade an existing (non-beta) TiddlyWiki to the beta version you just downloaded do the following: Open the TiddlyWiki beta fi...
TiddlyWiki - How to install an Adaptor

First I wasn’t sure how to install TiddlyWiki plugins. Then I figured that one out . Now I was a bit confused on how I was supposed to install a TiddlyWiki Adaptor (I always thought Adaptor was spelt with an ‘e’ but I guess not J ) I wanted to import plain text files as tiddlers, so was looking for a plugin to do this when I came across this page about importing on tiddlywiki.org. It mentions that “By default, content can only be imported from other TiddlyWiki documents [but] Adaptors can be used to extend that functionality to arbitrary sources”. The Adaptors page it links to simply contains a list of links to Javascript files, so I wasn’t really sure what to do with them a first. However, after downloading one of these Javascript files, the RawTextAdaptor.js , using right-click à Save Target As , and opening it in a text editor I saw there was a source URL ( http://devpad.tiddlyspot.com/#RawTextAdaptor ). I realized that RawTextAdapter was itself a tiddler on a TiddlyWiki compati...

Posterous.com Essentials

A couple of essentials I just read in the Posterous.com FAQ. TIP 1 To tag your posts place tags in the subject field in the following format: ((tag: apple, gadgets)) TIP 2 To ensure your corporate (or any other) email signature gets ignored place the following at the end of your post (BUT WITHOUT THE SPACE BETWEEN THE “#” AND “end”. I had to put that there or it would have been cut off.. that’s the whole point right!) # end Posted via email from gigajosh's posterous

Realtime TwitPic image stream

Why this site doesn’t show up near the top of results on Google for “twitter image stream” I don’t know. I found it back in my delicious bookmarks. It’s a stream of images posted on Twitter via the service TwitPic. Hopefully they’ll find the backing they need to open this up to all the other Twitter image services, and make the site look a lot cooler J http://picfog.com/ tags: twitter image photo picture stream twitpic streaming realtime This message is confidential and may be privileged. Any review, retransmission, dissemination or other use of, taking any action with reference to this information by persons other then the intended recipient is prohibited. If you receive this message in error, please notify the sender by reply e-mail and delete this message from all computers. Please note that e-mails are susceptible to change. The sender will not accept liability for the improper or incomplete transmission ...

Recover data from a restored iPhone (part 2)

Image
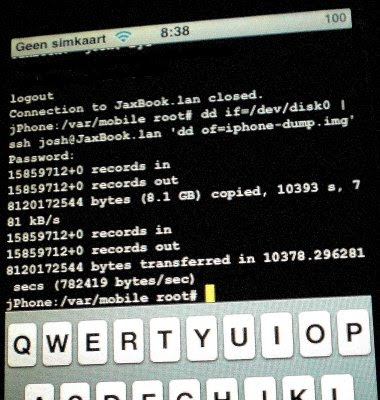
PLEASE NOTE : this method will almost certainly NOT work with an iPhone 4 or above, and may NOT work with the 3GS (although I have heard some report that it did work for them with a 3GS). The reason for it not working is to do with hardware encryption. Now on with the guide... This guide is the practical implementation of the "how to" guide that I posted a while back. That original "guide" only consisted of 3 links. The first link was to a modmyi.com tutorial, and the other two were to pages with Cygwin information. When I finally got around to executing the plan, I only needed the first link. Because since the original post I've bought a Macbook, and therefore don't need to use Cygwin (which for those that don't know provides you with a Unix environment inside Windows). So armed with the modmyi.com guide I set out on my little iPhone image dump adventure. I'm just going to repeat parts of the guide or reference it, adding little extras spec...

How to get an SSH server running on a Mac

To SSH into your Mac you just need to do the following. Go to System preferences >> Sharing Check the "Remote Login" box That's it! This will start sshd on your system and you can now be able to SSH your Mac with your usual Mac username and password. If this helped you out, hit the +1 button below. If not, feel free to leave a rude comment ;-)